

04 Apr, 2023
Posted on 04 Apr, 2023 by Admin, Posted in Dynamics 365 Power Apps
 Blogs
Blogs
Introduction: In this Blog, we will learn how to use Gallery Control and Form Control along with useful functions. Here we are using Gallery Control to show Contacts that exist in Dataverse and Form is used to Show Relative Details of the selected Contact in Gallery.
1. Open make.powerapps.com, select the Environment, and Create a Solution

2. (a)I have added Existing Entity Contact into the solution and
(b)Click on New, select Canvas App
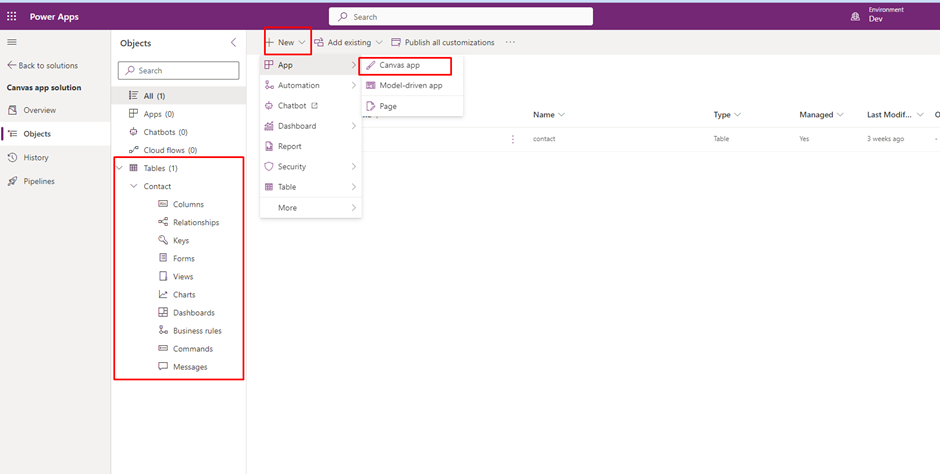
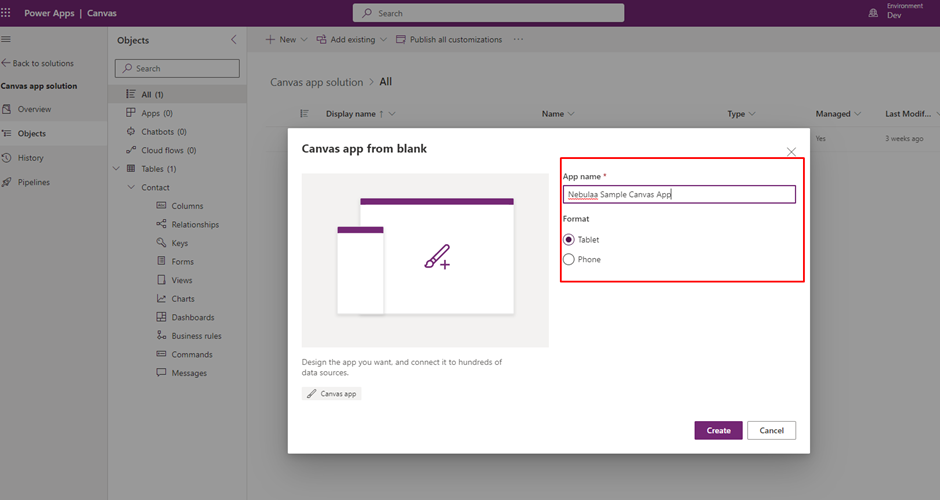
3. (a)Give a name for your App (Ex: App Name: Nebulaa Sample Canvas App)
( b)Here I have selected as Tablet Mode then Click on Create
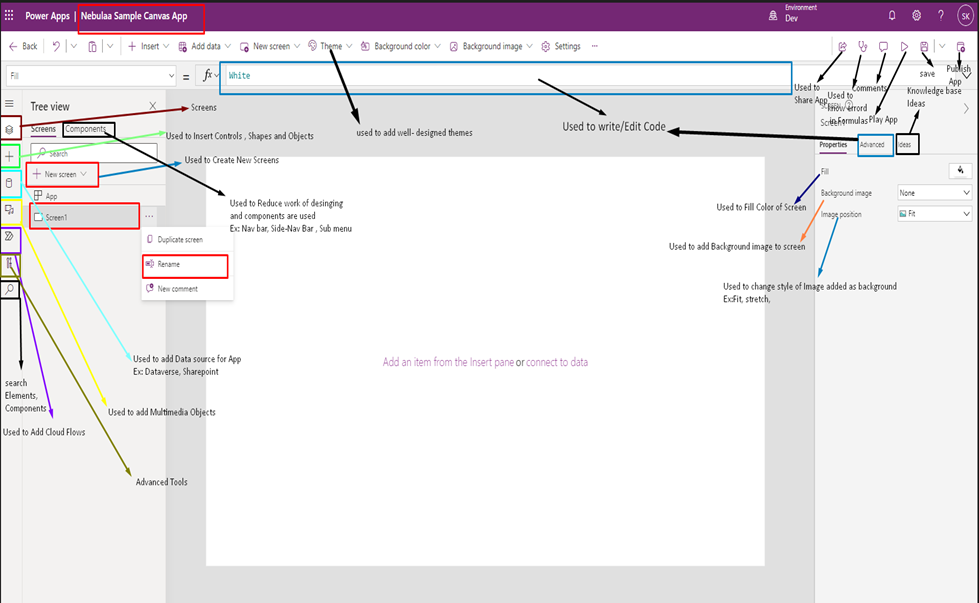
4. Here are the Screen and Options we can observe on Canvas App, do go through Image Attached carefully
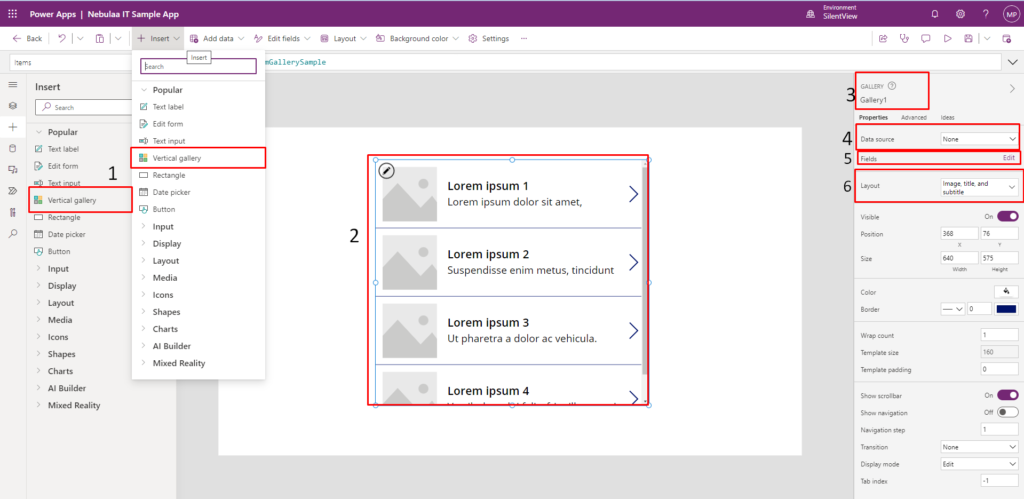
5. Click on Insert or “+” button select Vertical Gallery Control we can observe on Canvas App, do go through steps carefully.
1.To add Gallery click on Insert or “+” button and select Vertical Gallery Control
2.We can Observe Vertical Gallery contains sample Data and Dataverse has to be added.
3.We can Rename Gallery which is useful while writing the Formulae.
4.In Data Source You can choose whatever data you have designed.
5.We can Edit Fields or Add Fields which are exist in Data source.
6.Layout is used to change the view Vertical Gallery.
Note: To add Data You can add clicking on Data symbol from left panel or else add on Gallery properties on Right panel i.e., Data Source
6.Here observe we are using Dataverse in that taken Contacts table as my Data source.
Note: You can observe that we can change layout of Gallery as following, I am using Title and Subtitle Layout.
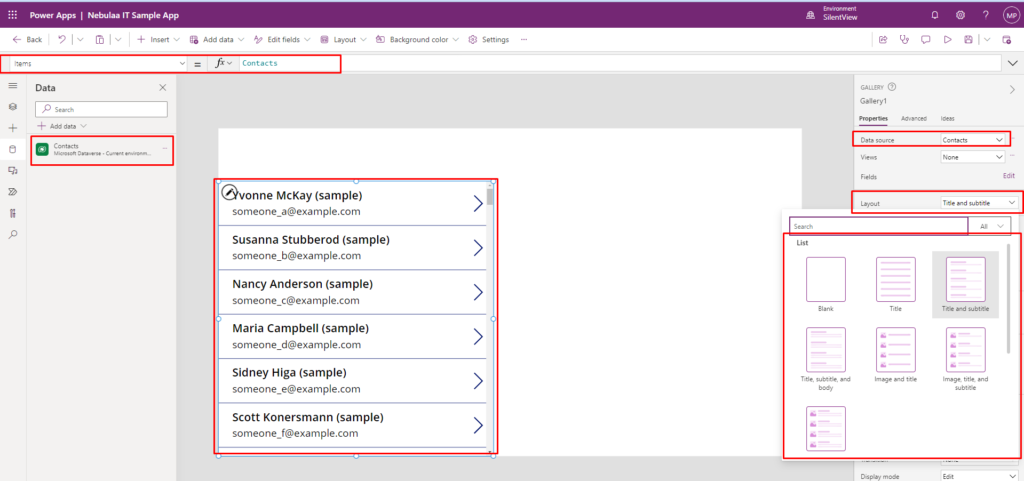
7.Here I am filtering Data using Filter Condition on Items Property of Gallery.
The Filter ( ) function finds records in a table that satisfy a formula. Use Filter to find a set of records that match one or more criteria and to discard those that don’t.
Syntax:

Filter(Table*, Formula1 [, *Formula2*, ... ] )
Formula used:

Filter(Contacts,'Active Contacts')

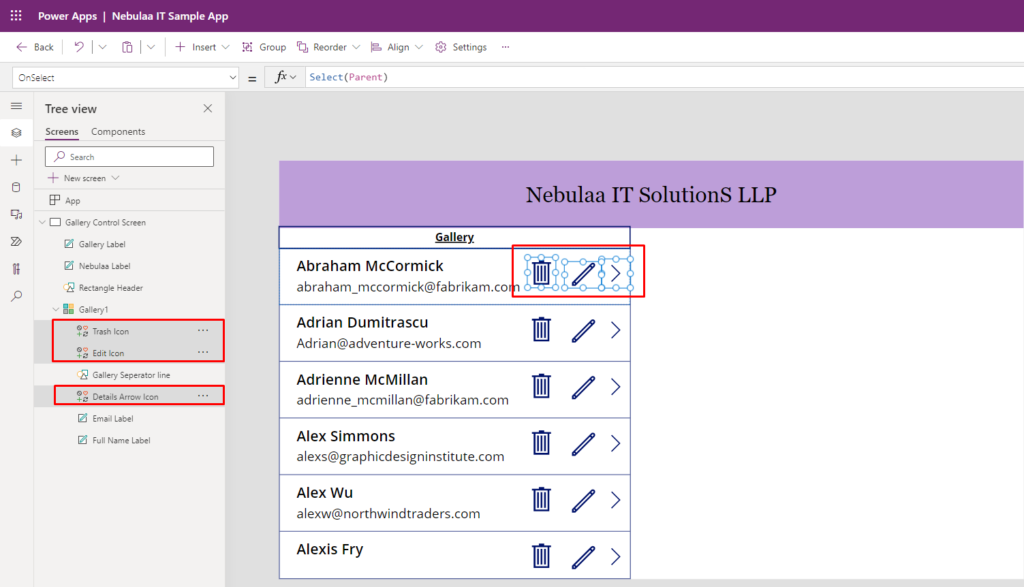
8.Add Icons into Gallery which we are using for View Details, Edit Details, Delete Record from Gallery

Note: To Insert Icons into Gallery select Gallery and Click on “+” or “+ Insert ” and select Icons browse whatever Icons you want to use

Here I am using Three Icons

1.Right Arrow -> For View Details

2.Edit Icon -> For Edit Details

3.Delete Icon -> For Remove Record from Gallery
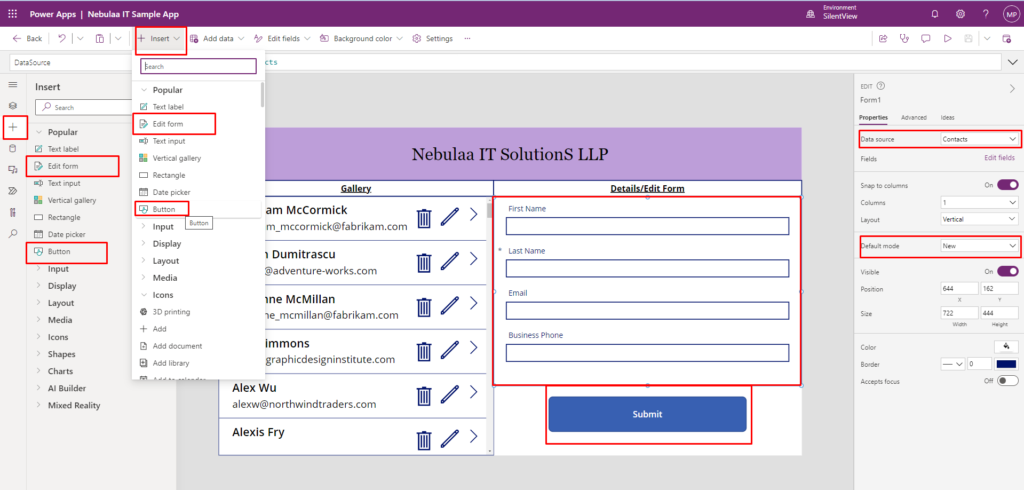
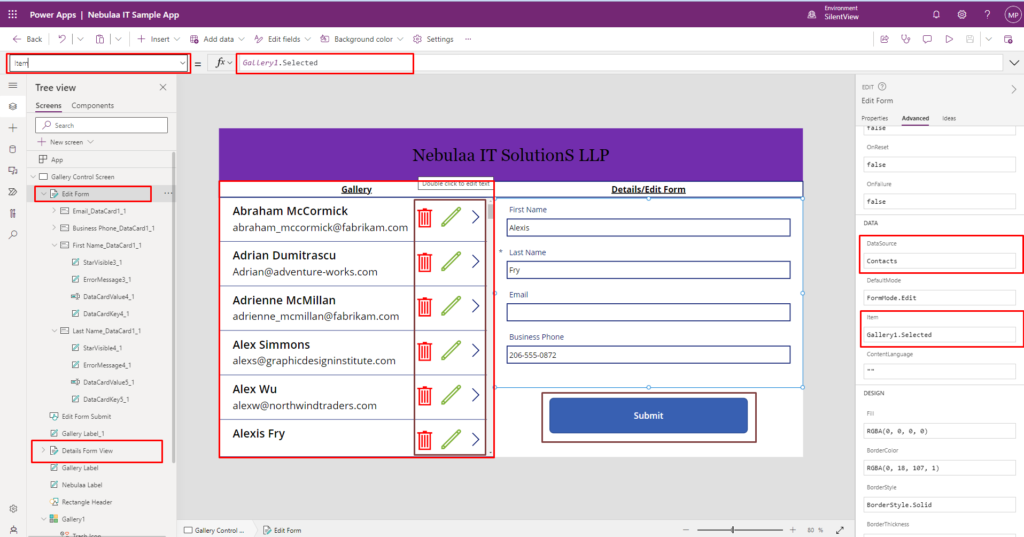
9. Insert Two Forms clicking on “+” or “+Insert” select Edit Form and Source of Form as “Contacts.”

One Form is for Details

One for Edit Selected Record Details
Edit Form:
Default Mode of Form must be Mode for Edit Form
View Form:
Default Mode of Form must be in View for Details Form.
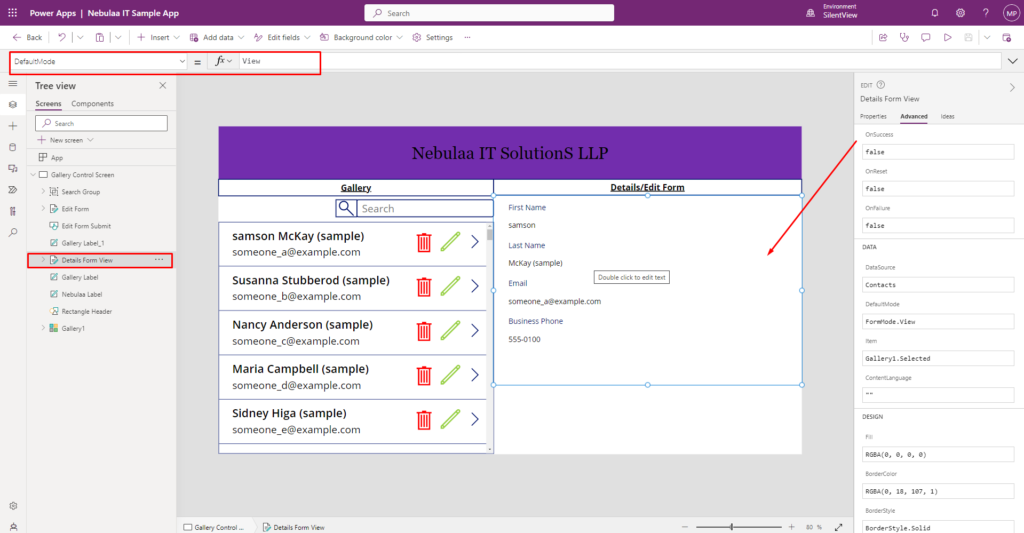
10. On ” Item ” property on Form, Details Icon (Right Arrow Icon) and Edit Icon write a formula that to display selected item of Gallery.
Syntax:
Galleryname.Selected
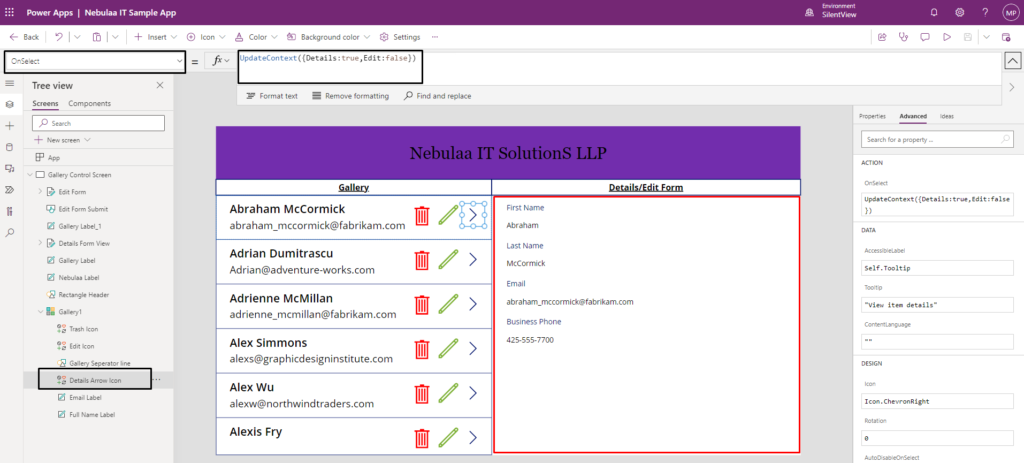
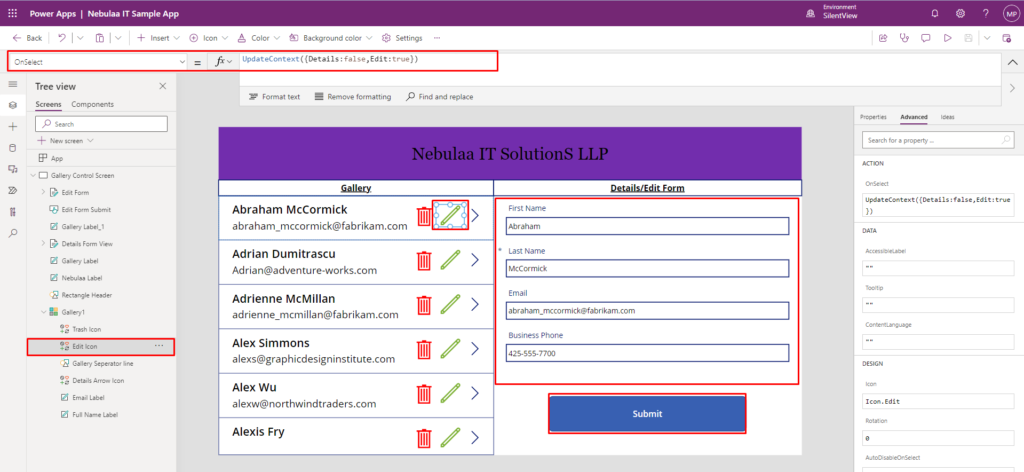
11. Read carefully that OnSelect Property of Gallery use this formula which Updates context that holding context variables to Show or Hide Forms based on Gallery Selection .and use the Context Variable OnSelect Property of Form which is used to Show or Hide Form based on Update context variables.
UpdateContext(): Use the UpdateContext function to create a context variable, which temporarily holds a piece of information, such as the number of times the user has selected a button or the result of a data operation.
Syntax:
UpdateContext( { ContextVariable1: Value1 [, ContextVariable2: Value2 [, … ] ] } )
ContextVariable1 – Required. The name of a context variable to create or update.
Value1 – Required. The value to assign to the context variable.
ContextVariable2: Value2, … – Optional. Additional context variables to create or update and their values.
OnSelect of Details Icon:

UpdateContext({Details:true,Edit:false})
OnSelect of Details Form:

Details
OnSelect of Edit Icon:
UpdateContext({Details:false,Edit:True})
OnSelect of Edit Form:
Edit
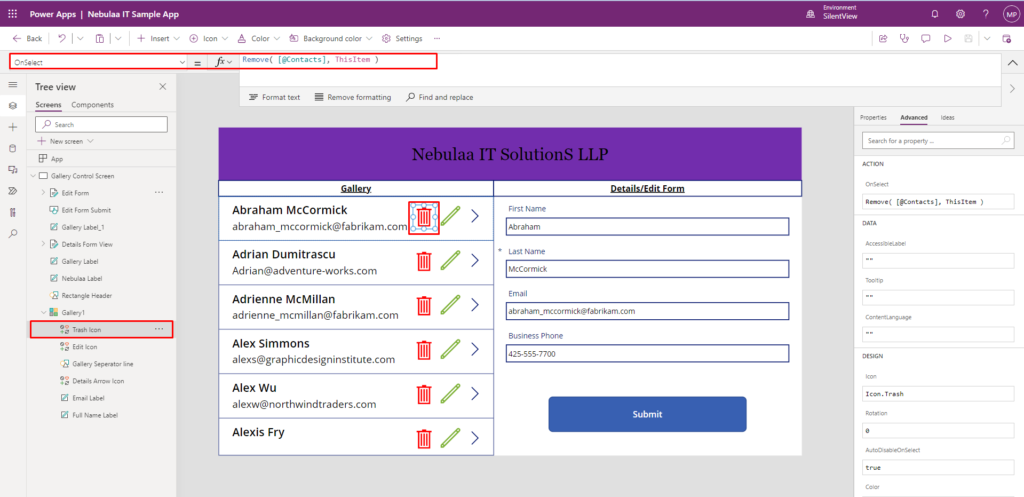
12.Use the Remove function to remove a specific record or records from a data source.
Syntax:
Remove(DataSource, Record1 [, Record2, … ] [, All ] )
DataSource – Required. The data source that contains the record or records that you want to remove.
Record(s) – Required. The record or records to remove.
All – Optional. In a collection, the same record may appear more than once. You can add the All argument to remove all copies of the record.
OnSelect Property of Delete:

Remove(@Contacts), ThisItem)
13.Searching Records in Gallery, For Designing Search Box by clicking on “+Insert” or “+” Icon, add Text Input Box and a Search Icon, select both of them and on left panel right click and make them as a Group.
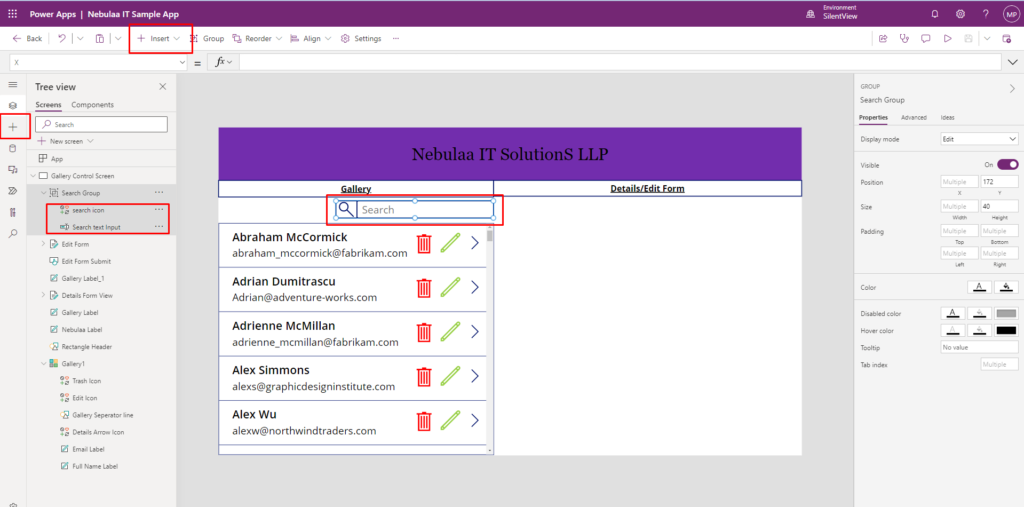
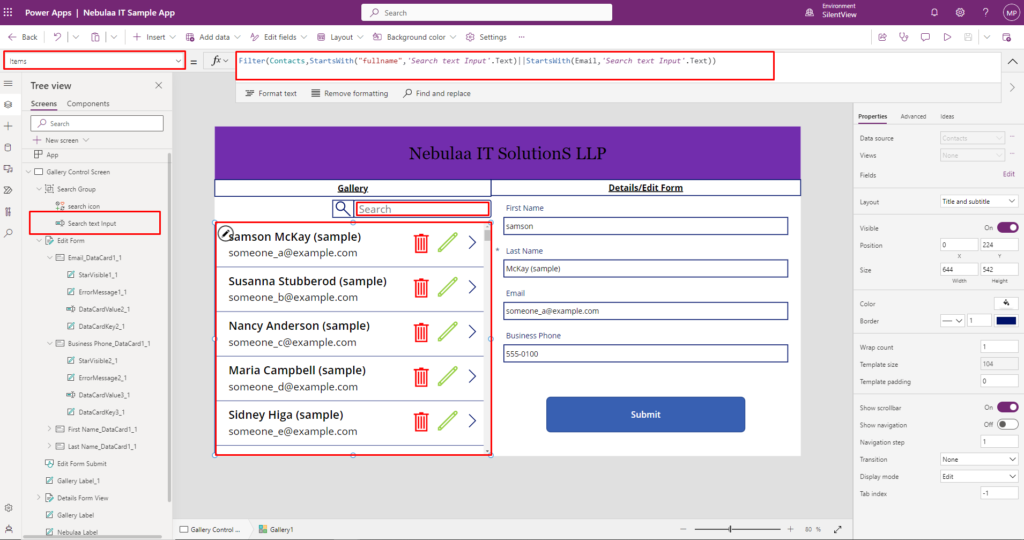
14. Add a Formulae on Item property of Gallery where for searching records in Gallery we use StartsWith() function along with Filter where The StartsWith function tests whether one text string begins with another.
Syntax: StartsWith( Text, StartText )
Text – Required. The text to test.
StartText – Required. The text to search for at the beginning of Text. If StartText is an empty string, StartsWith returns true.
On Item Property of Gallery :

Filter (Contacts,StartsWith("fullname",'Search text Input'.Text)||StartsWith(Email,'Search text Input'.Text))
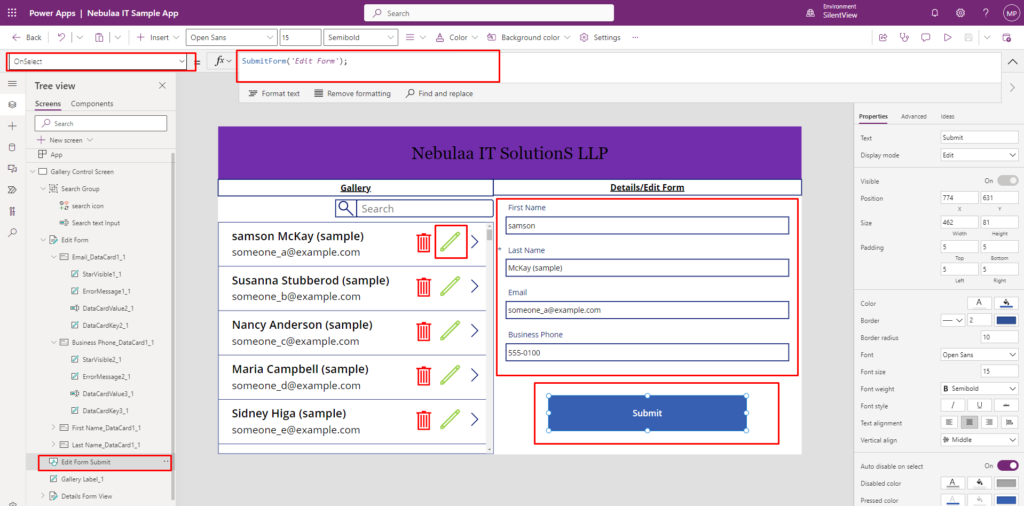
15.Use the Submit Form function in the OnSelect property of a Submit Button control to save any changes in a Form control to the data source.
Syntax: SubmitForm( FormName )
FormName – Required. Form control to submit to the data source.
OnSelect Property of Submit Button:

SubmitForm('Edit Form');
OnVisible Property of Submit Button:

Edit
Comment