knowledgecenter-breadcrum

Knowledge Center

16 Feb, 2020

How to add custom HTML web resource on a form and use DataTable plug-in to display a grid?

Posted on 16 Feb, 2020 by Admin, Posted in Dynamics 365

How to add custom HTML web resource on a form and use DataTable plug-in to display a grid? Blogs

How to add custom HTML web resource on a form and use DataTable plug-in to display a grid?

Introduction

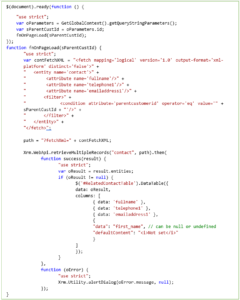
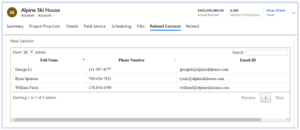
In this blog I have explained How to add custom HTML web resource on any dynamic 365 form to display data in a grid. To display data in grid format I used DataTable plug-in.

Solution

When we use custom HTML web resource, then we need to manually design the web page. It means to present data nicely on HTML web resource we should use bootstrap, jQuery, CSS and JavaScript. DataTable is the free jQuery plug-in which is used to display data in table format. It is a highly flexible tool, built upon the foundations of progressive enhancement, that adds all these advanced features to any HTML table. We will use DataTable to display data in grid format.
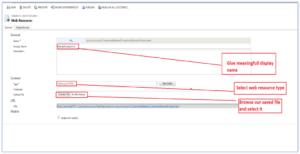
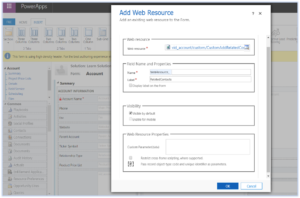
Below are the steps to add HTML web resource and code to display related contact in a grid on account form as an example.

Step by step

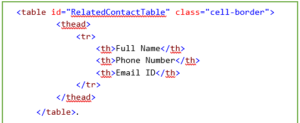
First, create a HTML document to display related contact.

tag:tag for getting execution context as following:

tag, add table using tag and give appropriate id table as following:

  • Add any class from dataTable.css to use style for grid like I used “cell-border”.
  • Now write a JavaScript code to retrieve related contact and incorporate to table using dataTable jQuery plugin. You can write as following:
  • In above code, firstly, I passed parent customer id, which I took from execution context to function. In function I fetched records from contact table, those having same parent customer id. After that I passed the result to dataTable by matching columns. Here I used WebApi.retrieveMultipleRecords method to retrieve records.
  • Now, save the file.
  • Add that file as a web resource to Dynamics 365. Be sure to select HTML Page as the type and upload the HTML page using the Browse button. Save and publish the web resource. Next, we’ll add it to the Account form.
  • Next, navigate to the Account form and add a new web resource from the Insert tab.
  • Refresh your Account form and the HTML page will appear on the page.
  • I added HTML page in new tab, and it look like following:

Comment

This is a Required Field

Loading

Recent Updates

Blogs
31 Mar, 2026

Debugging Power Pages Server Logic Using Visual Studio Code

Power Pages Server Logic allows developers to execute secure backend JavaScript directly within Power Pages. It is commonly used for…

READ MORE
Blogs
31 Mar, 2026

Create and Deploy a Single Page Application (SPA) in Power Pages

In this blog, we’ll build and deploy a Single Page Application (SPA) using React + Vite and host it on…

READ MORE
BuildAndDeployPCF_Thumbnail.png
Blogs
25 Mar, 2026

Build And Deploy Your First Dataset PCF Control In Dynamics 365

Introduction In Dynamics 365, subgrids are commonly used to display related records, such as Opportunities under an Account. While out-of-the-box…

READ MORE