
15 Feb, 2023
Posted on 15 Feb, 2023 by Admin, Posted in Dynamics 365 Power Automate Power Apps Dataverse Power Platform
 Blogs
Blogs
In this Blog, we will learn how to create A Login Page and Validate Login using Credentials (for example if a user is one of the contacts in the Contact Table in Dataverse, he will have eligibility to log in else he has to register)and if a New user is registering the Username and Password sent to his mail mentioned in the registration form using Cloud Flows (Power Automate Flow)
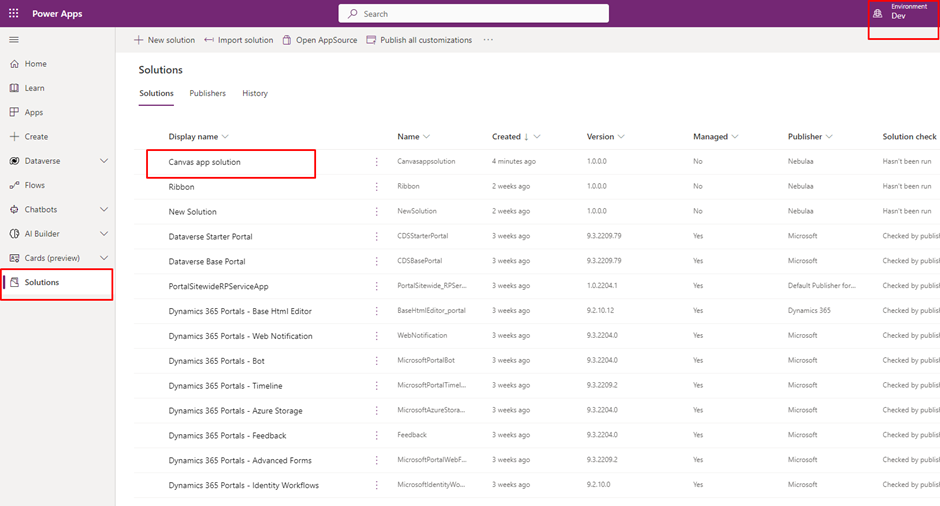
1. Open make.powerapps.com, select the Environment, and Create a Solution for Canvas App if you are using Dataverse as Database.
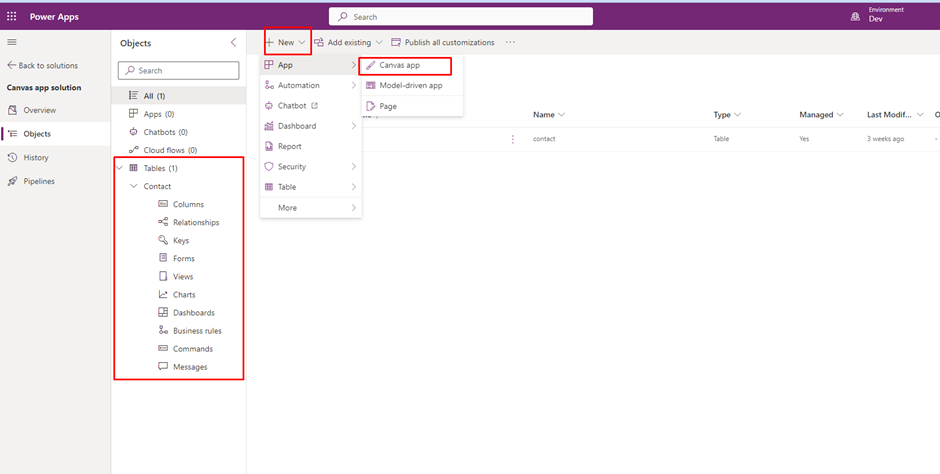
2. (a)I have added Existing Entity Contact into the solution and
(b)Click on New, select Canvas App
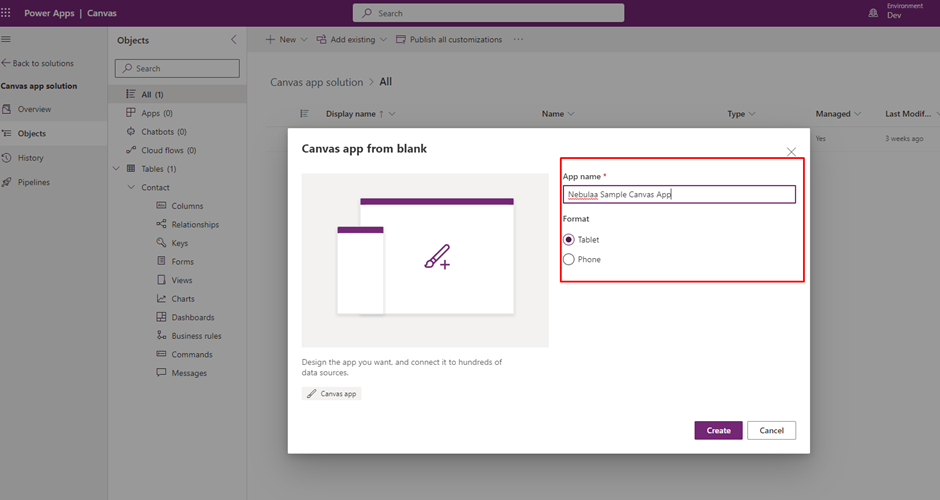
3. (a)Give a name for your App (Ex: App Name: Nebulaa Sample Canvas App)
( b)Here I have selected as Tablet Mode then Click on Create
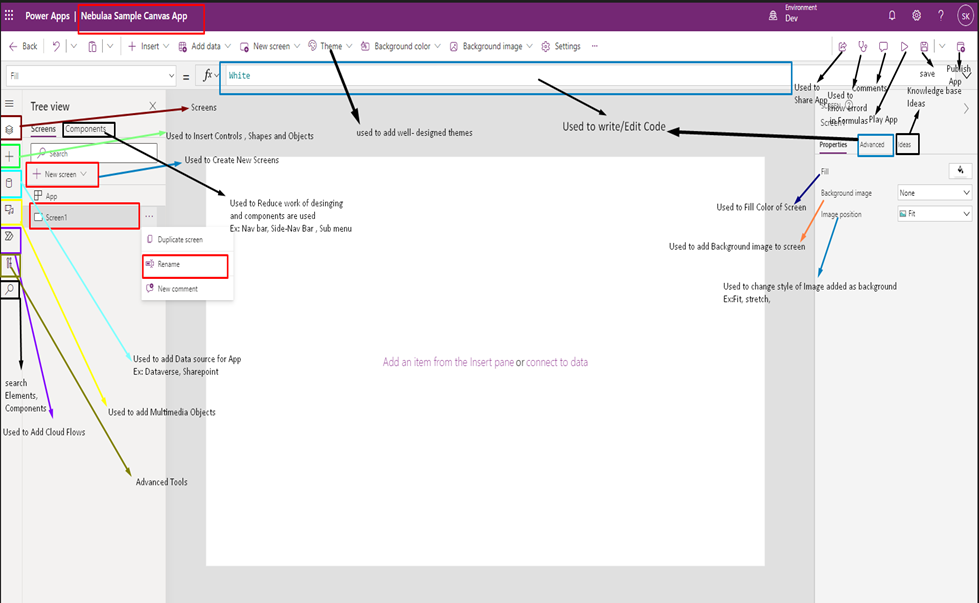
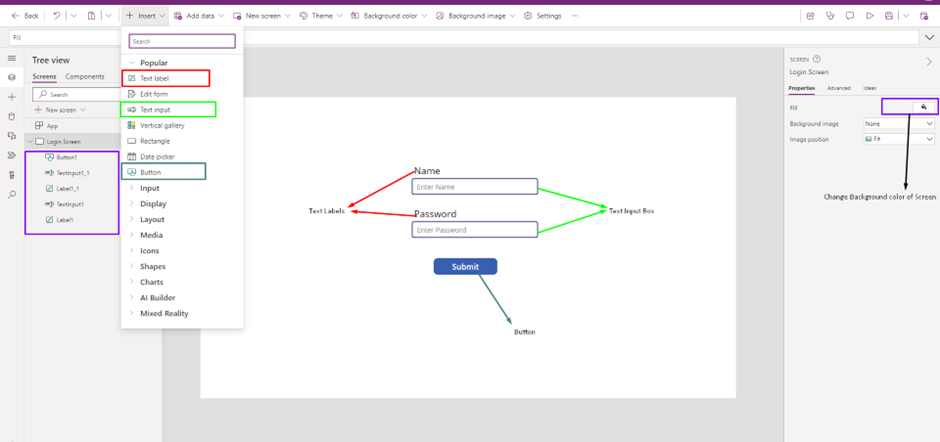
4. Here are the Screen and Options we can observe on Canvas App, do go through Image Attached carefully
5. Create A Login Screen:
Click on the Insert button on Ribbon or Click on the ‘+’ Button on Left Pane, it will show a dropdown of Elements that are useful for designing the Login Screen.
1. Add Text Labels: (Ex: Name, Password)
2. Add Two Text Input Box
3. Add Button (Ex: Submit)
and rename them as required
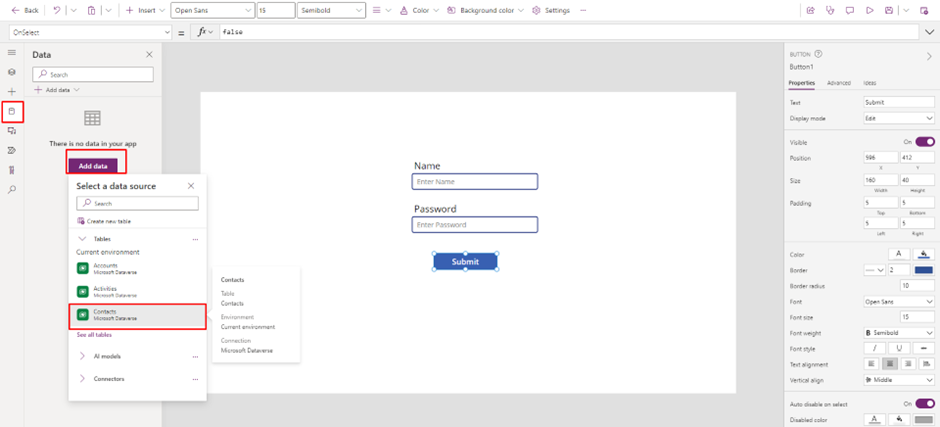
6. Click on Data Icon in Left Pane and Add the Data source into the Application as shown below, I am using Tables from Dataverse as Data sources, but you can also use different types of connectors Example: 1) Excel 2) SharePoint, etc.
From the Tables, Data source I am adding the Contacts Table.
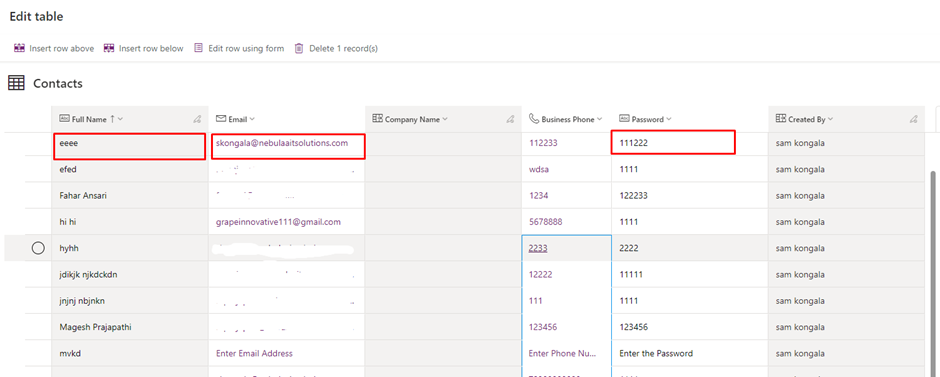
7. Note: Contacts Table contains this data where Full Name act as Username, Password as User Password(Custom Field ), Email contains the Email of the User
8. Here I have a designed Login Screen,
Adding Background Colors, Rectangles, Labels, and Colors
I have created three more Screens along with Login Screen as shown below
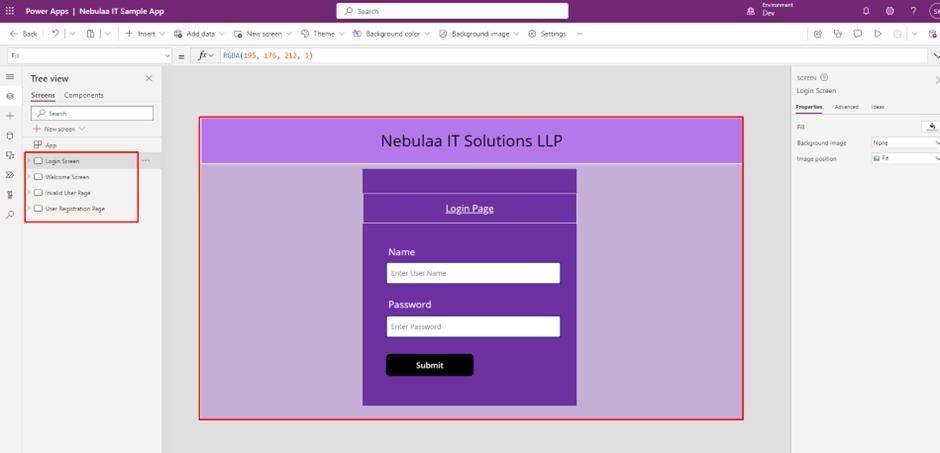
9. Same as the Login screen I have Created Screens like Welcome Screen, Error Message Screen, and User Registration Screen
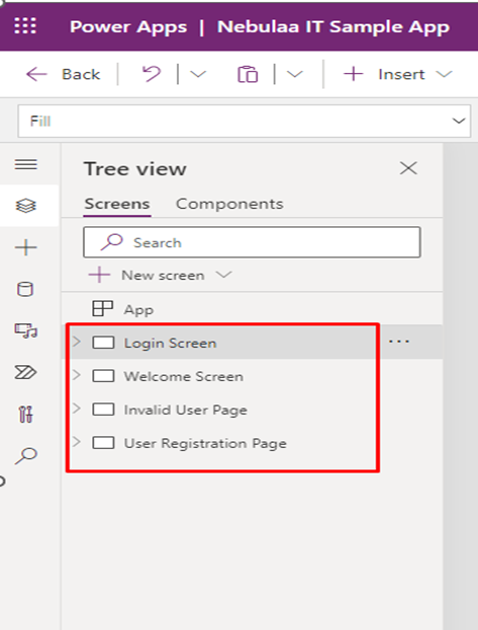
10. Where Welcome Screen contains a welcome Message with Star Icons, it will appear when a user enters valid Login credentials.

11. Where the Invalid User Screen contains an Error Message with Key Icon,
Two Buttons (Back to Login and Create New User),
Invalid User Screen will appear when a user enters Invalid Login credentials which do not exist in the Contacts Table
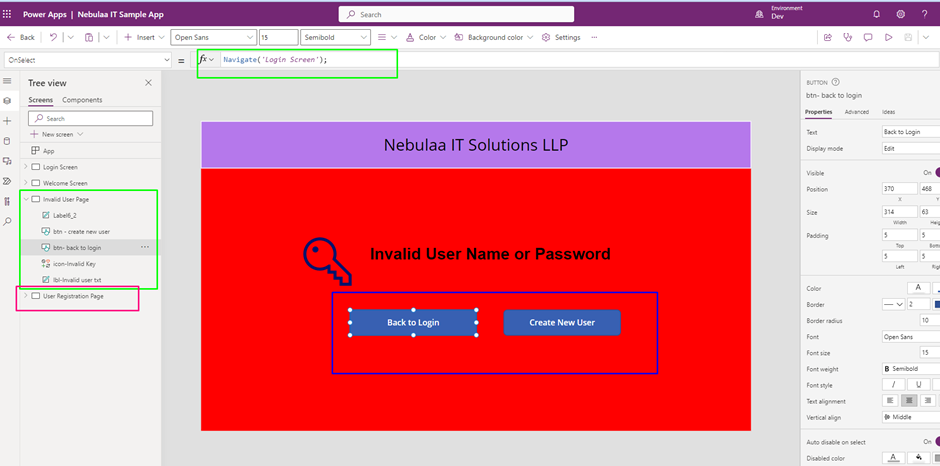
Formula On Select Property of Both Buttons
1)Back to login =>Navigate(‘Login Screen’);
 2)Create New User => Navigate (“Registration User Page”);
12. Where the User Registration Screen contains Form Control, by clicking on Insert from the ribbon or + Button from the Left pane, Add Edit Form in the Screen as shown below,
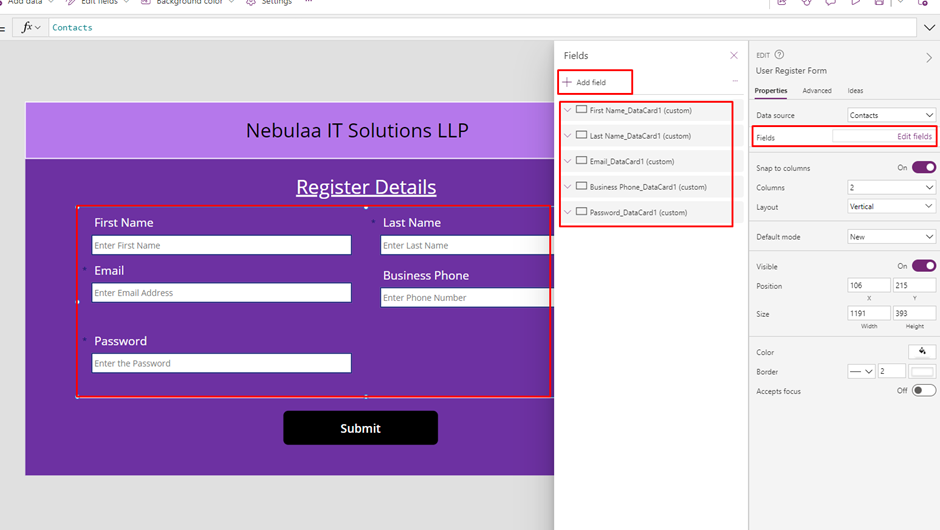
select Data source in the Right pane as Contacts, Edit Fields select columns as what you want
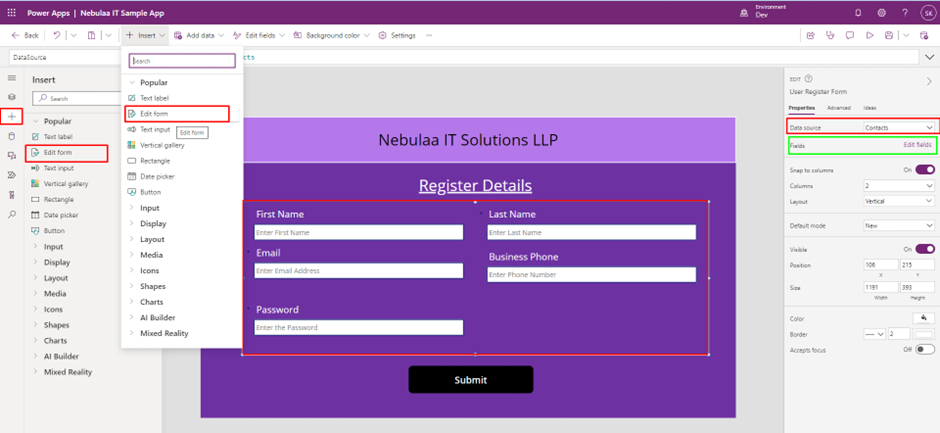
Add Fields from the Right pane Click on Edit Fields and Add Fields as what you want to see in the Form
Note: The form which you have added Must be in Default mode = New
13. After entering the Details in the Form user can submit the form and data added to the Data source i.e., Contacts Table
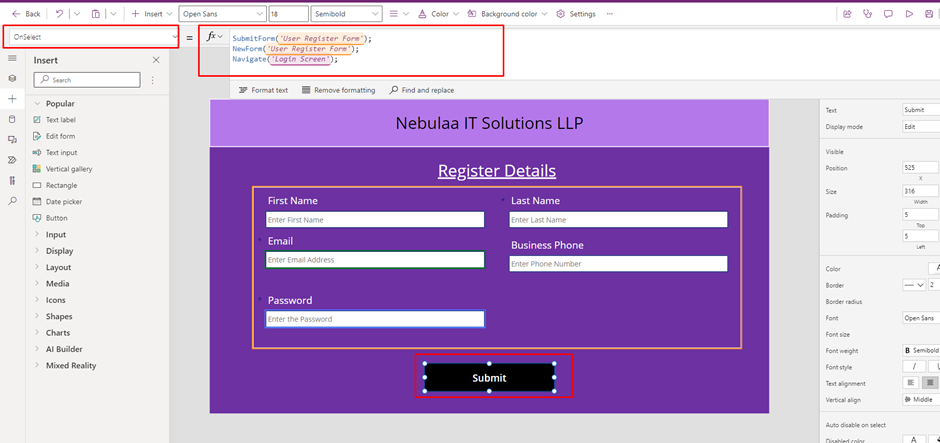
On select Property of Submit button write this Formula:
SubmitForm('User Register Form');
NewForm('User Register Form');
Navigate('Login Screen');
-> Where SubmitForm() function submits the form to the data source i.e. Contacts Table.
-> NewForm() function refresh and Loads New Form.
-> Navigate() function Navigates to the Login Screen.
14. After submitting data, Data is Added to the Contacts Table and Navigates to Login Screen.
On the Login screen, Write the formula on Submit button which validates the User and
It navigates to the Welcome Screen else it navigates to the Invalid User page
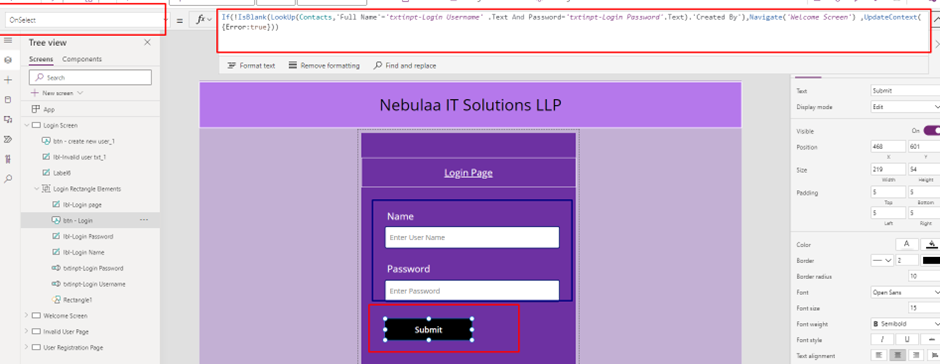
On select property of Submit button write this Formula:
If(!IsBlank(LookUp(Contacts,'Full Name'='txtinpt-Login Username' .Text And Password='txtinpt-Login Password'.Text).'Created By'),Navigate('Welcome Screen') ,Navigate(‘Invalid User Page’))
-> Where the Formula contains
If(!IsBlank(Lookup(Datasource,’Field.name’= ‘textinput.username’ And ‘Field .password’ = ‘textinput.password’).’uniqueid’),Navigate(“Screenname”),Navigate(“Screenname”))
Where If is the conditional operator
-> != not equal to
-> IsBlank = The IsBlank function tests for a blank value or an empty string. The test includes empty strings to ease app creation since some data sources and controls use an empty string when there is no value present.
-> Lookup = The LookUp function finds the first record in a table that satisfies a formula. Use LookUp to find a single record that matches one or more criteria.
-> Data source = Database from where we have loaded Tables or from Connectors like Excel and SharePoint
-> Field. name refers to the Username in the database and checks if it is equal to
text input box user name
-> Field. Password refers to the User name in the database and checks if it is equal to
text input password
-> ‘created by’ or any Unique Id form Fields that you can identify record with a unique Id from the data source
-> Navigate () – Function used for Navigating Screen from one to another Screen
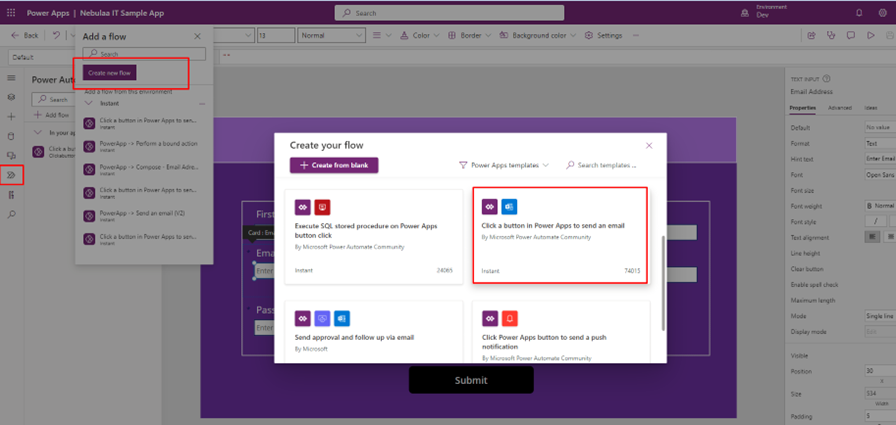
Sending Email to User Credentials to User Email Using Cloud Flow
1. Click on Left Pane Power Automate Flow Icon
2. Click on Create Flow
3. Select Click a button in Power Apps to send An Email
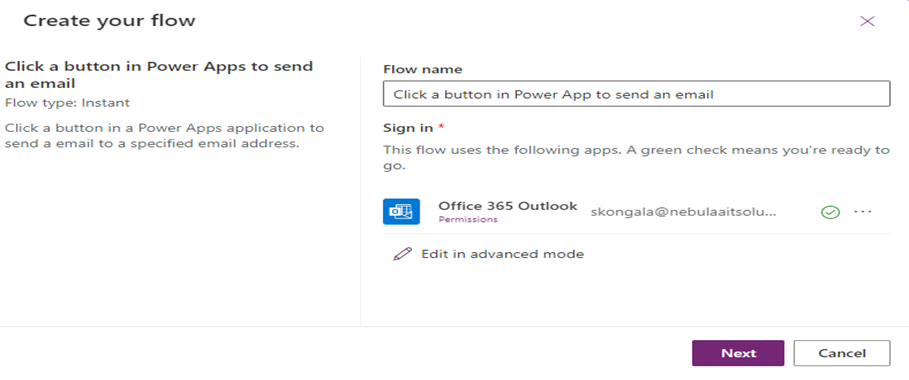
4.Name your Flow, Sign in with your Outlook Mail, and Click on Next
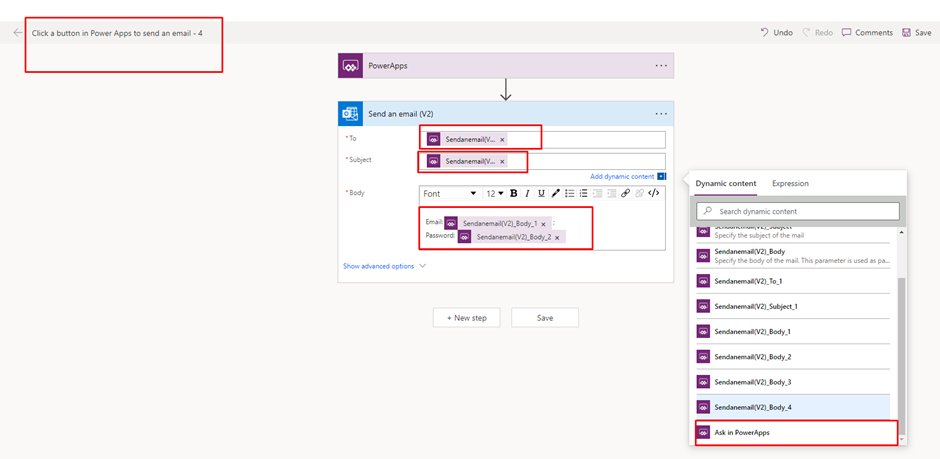
5.Add Dynamic Content to your Outlook mail as Ask Power Apps , where we can run them from Canvas App using the Run()Function.
To: Dynamic Content as = Ask Power Apps
Subject: Dynamic Content as = Ask Power Apps
Body: Dynamic Content as = Ask Power Apps
Email: Dynamic Content as = Ask Power Apps
Password: Dynamic Content as = Ask Power Apps
6. In the Canvas App on Submit Button of the Contact Form, Add the Below Formula as Shown in Below Screenshot
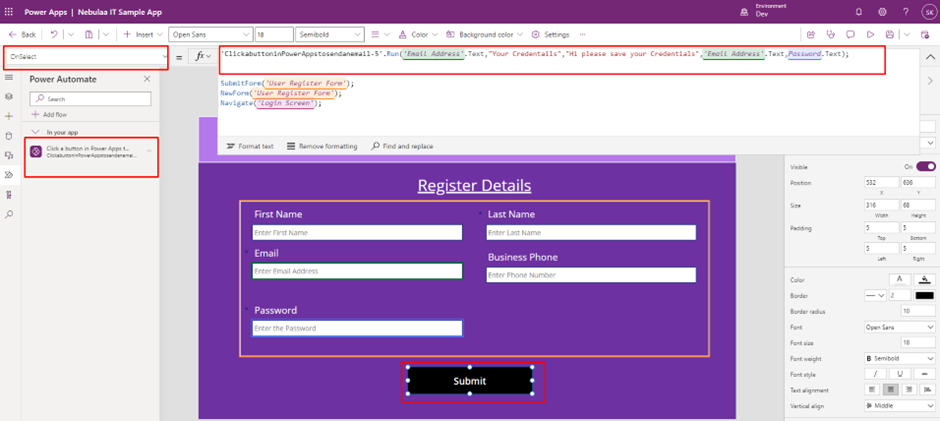
On select property of Submit button call Run() Function & write this Formula:
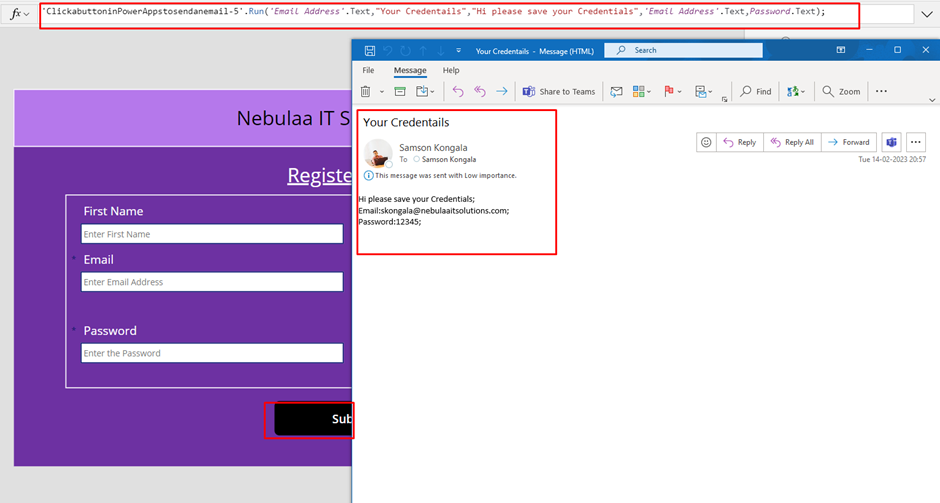
'ClickabuttoninPowerAppstosendanemail-5'.Run('Email Address'.Text,"Your Credentails","Hi please save your Credentials",'Email Address'.Text,Password.Text);
Explanation:
‘ClickabuttoninPowerAppstosendanemail-5’ is the Name of the Flow
Run() Function: The run () function is based on the parameters you specified within your flow using the “Ask in PowerApps” dynamic content of the PowerApps trigger button
Ex: Run(To,Subject,Body,parameters);
Name of the Flow.Run(Email To , Subject of the Email, Body of the Email, Email Address /User Input.Value/Text , Password/User Input.Value/Text)
7. An Outlook Mail sent from signed-in mail credentials to the Email Address mentioned in the Contact Form on Submitting a Record to the Contact Form.
As shown Below
Comment

Introduction: Organizations frequently generate documents like invoices, certificates, quotations, transcripts, inspection reports etc. While single-value fields such as Name, Email,…
READ MORE
The Problem Recently, we faced an interesting issue while working with the Status Reason (statuscode) field on the Contact table.…
READ MORE
There are certain things in a CRM project that a QA must validate or verify before any solutions gets deploy…
READ MORE